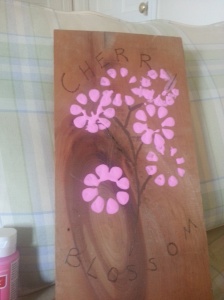
There are times when I get these fantastic ideas that I can do DIY. This particular time my boyfriend responded to my fantastic idea with “Babe, please be careful. And maybe buy a small burn kit.” Clearly he had little faith in me.
So what was this crazy idea you ask? Well my blogging friend Ronnie wrote this post about flowers and proceeded to showcase some gorgeous photos. This post got my mind thinking about Cherry Blossoms. I could not get them outta my head and I knew that I had to do some sort of project with it.
On one of my many Pinterest binges I had found this project that seemed pretty easy to do. Trouble was I found it boring. Truth be told I think most things that are in my wheel house in the craft department, boring. So I wanted to spice it up.
On a few different blogs I had learned about wood burning. So the crazy girl that I am, I decided to combine the projects. Here is what I did, step by step:
1) First I gathered my materials: Paint (brown and pink), slab of wood, paintbrush, wood burning pen.
2) Next I stenciled my design in pencil and burned it into the wood with my new pen. For the record not a burn was had on that day!
3) Next I took a water bottle and painted by Cherry Blossom’s Pinterest style.
4) Finished up by coloring in the burnt wood tree trunk brown and cleaned up a bit of the errors.
Now the project isn’t perfect nor what I had envisioned in my head. If I do it again I would take more time and make my burns darker. I would also probably look for a softer wood so the wood would burn easier. Also, I would be a little more careful with the pain as clearly I made a few errors. But all in all it was not too bad for a beginner DIY and now I have a Cherry Blossom in my home all year round 🙂
So bloggers what do you think of my Cherry Blossom DIY?


I remember you saying how much you liked cherry blossoms. I think the soda bottle thing is really cool and the pink really stands out on that color of wood. Nice!
Thank you! I do love Cherry Blossoms! I will have to come up with some new projects for them 🙂
Looks like a job well done, especially for a first try. First I ever heard of wood burning.
Thanks! And you need to try wood burning even if only for the smell!
Shae
*clapping*
BRAVO, Shae! Your DIY project came out AWESOME! And yes, I remember you mentioning about your love of cherry blossoms. Me too!
I love how you used the bottom of the plastic bottle to create the blossoms. Very clever!
Well done, girl! Have a super Monday!
X
P.S. sorry about the comment above. I must have hit the publish button before I finished typing.
Thanks Ron! Pinterest is great for getting ideas! I wish it came out a bit better but its a learning process 🙂
I think it’s beautiful. You’ve inspired me to try this now (although, I may need a burn kit as well) 😉
Please let me know if you do! Ill bet you will have better luck!
How cool. I love pink and it just jumps out at you! Great job.
Thanks so much!
Excellent work, Shae! Good for you!
Thanks Rob!
This looks great, and fun too!! Never heard if a wood burning pen but it sounds like a lot of fun!!!!
It is a lot of fun and smells fantastic (but I admit I’m a bit odd)
Wow that looks fantastic. I love pinterest so full of idea sharing and inspiration. You did a great job. Don’t know why hubby has no faith? lol I can relate to the burning kit hahah I burnt myself pretty bad doing Missy Moo’s tassel garlands for her party. lol Thanks for linking up to Share With Me. #sharewithme
Lol he has no faith because I am a walking disaster! plus I am not as crafty as I like to think I am hehe.